D o you want to learn how to create an online course with WordPress? Keep reading to find out how to develop an online course and make money online.
Creating an online course is a popular way to monetize your blog. With an online course, your blog readers are able to pay to learn more about the subject you’re teaching.
But, how do you get started?
In this article, we’ll show you how to create an online course with WordPress and make money online.
Let’s go!
Why Create an Online Course?
As we mentioned before, creating an online course is a great way to monetize your blog.
Blogger Kate Kordsmeier made a whopping $117,497.93 in January 2020, according to her income report. And the majority of that revenue came from the online course she offers!

Developing an online course requires only a very small investment to start and you don’t need a lot of technical knowledge.
Plus, you only need to create your course once, and then you can sell it over and over again. So, you can start generating passive income from your blog.
As you can see, creating an online course has the potential to bring in big bucks!
There are other benefits to creating an online course too, including:
You can provide more valuable content to your blog readers. It’s an effective way to establish authority and credibility in your niche.You can expand your reach and attract a new audience to your site.You can build a community of like-minded individuals.And eLearning is incredibly popular these days, so you don’t need a huge following to get results quickly.
Now that you know why you should create an online course, let’s take a look at what you need to get started.
Online Course Creation Checklist
You might be wondering, how do I create an online course for my website? Doesn’t that take a lot of work?
Don’t worry.
It might seem difficult to create an online course, but it’s actually pretty easy with WordPress.
All you need to start your online course is:
A Domain Name – This is your website’s address, like www.BlogTyrant.com. WordPress Hosting – This is where your website’s files are stored. We recommend Bluehost, it’s the best WordPress hosting on the market. An LMS Plugin– An LMS (learning management system) plugin helps you easily create and manage courses on WordPress.If you haven’t created a website yet, check out our guide on how to start a blog for step-by-step instructions. Then, come back to this article to set up your online course.
And if you’ve already got a website up and running, let’s dive into the tutorial!
How to Create an Online Course with WordPress
1. Pick the Perfect Course Topic
Before you actually start building your online course, you need to do some planning—starting with picking the perfect course topic.
Choosing the right topic for your course is important. You don’t need any formal teaching experience, just choose a topic you’re knowledgeable in and passionate about. But remember, the topic has to be interesting to your target audience as well.
That’s why many bloggers choose a course topic that’s related to their blog niche.
For example, if you have a food blog and you write a lot about nutrition, creating an online course about nutrition makes perfect sense; you’re already knowledgeable in the subject and you know that your blog readers are interested in it too.
Here’s how The Creative Penn blog does it:
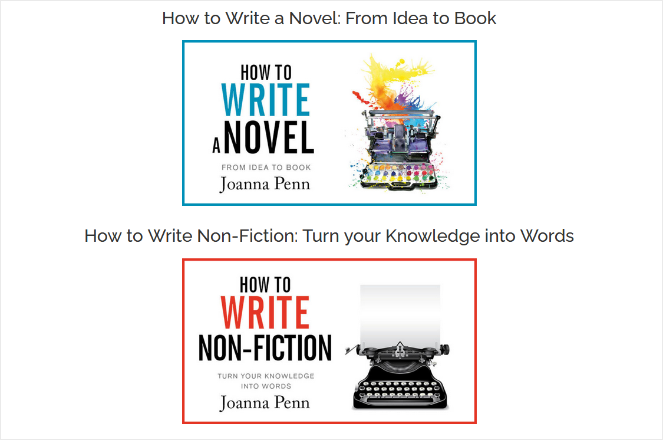
The blog teaches people how to write and publish their own books. So, they offer a few different online courses on how to write a novel, how to write non-fiction, and others.
There are online courses for every subject imaginable: budgeting, knitting, gardening, photography, writing—the list goes on.
If you have a passion for it and experience with it, chances are that it’s a good course topic.
But, you should also do some market research on the online course topic you choose.
Do a Google search for your online course topic. If you find that there are other people offering the same topic as you, that’s good because that means there’s a market demand for it.
Now you need to find a way to stand out from the crowd though.
To do that, study your competitors and figure out how your course will be different from theirs.
Think about the answers to these questions:
Why should people take your online course?What does your course offer that the other courses do not?This will help you come up with a USP (unique selling proposition) so that you can stand out from your competition and make your online course a best-seller.
2. Gather and Prepare Your Course Content
Once you’ve decided on your topic, it’s time to gather and create the content that will be in your course.
If you’ve already got a blog with a lot of posts on your course topic, you’re off to a good head start. Because you can repurpose your existing content and expand upon it for your online course. This will save you a ton of time.
Along with the text of your online course, don’t forget to include images and videos to boost engagement and explain difficult concepts easier.
When you’ve gathered all of the material you want to include in your course, create an outline and organize your content into sections that guide learners through your topic, step-by-step.
Here’s an example of how to structure an online course.
The Thrifty Homesteader offers an online course on how to raise goats. The course is organized into sections like buying your goats, fencing, housing, day-to-day care, and so on.
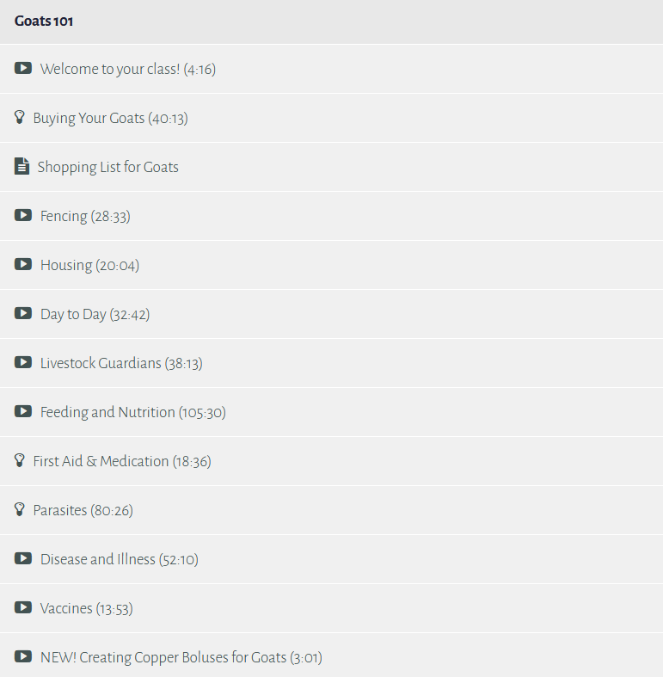
Organizing your course lessons in a similar way will help you create clear learning objectives for your students and they’ll be able to follow the information easily.
3. Use the Right LMS WordPress Plugin
Now it’s time to start creating your online course in WordPress.
Like we mentioned earlier, you can easily create an online course in WordPress with an LMS plugin. There are a number of LMS plugins on the market like LearnDash and LifterLMS.
But at Blog Tyrant, we recommend using MemberPress.
MemberPress is a powerful and easy-to-use membership plugin that comes with built-in features to create, manage, and sell online courses through WordPress.
Instead of simply adding an online course to your site with a regular LMS plugin, you can turn your blog (or a section of your blog) into a membership site with MemberPress.
This means you can lock exclusive content, like online courses, forums, premium blog posts, and more, behind a member’s-only area and give only paying members access to it.
And creating courses with MemberPress is super easy!
The visual course builder is built on top of the WordPress block editor, so it’s just like creating a blog post in WordPress.
You can drag and drop lessons, topics, categories, videos, images, and more, to build your course curriculum.
MemberPress also offers a special Classroom Mode setting. This means you don’t have to worry about designing the course yourself. Membership handles it for you and ensures your online course always looks professional.
Here are some other powerful MemberPress Courses features:
Accept payments for courses or create free coursesAbility to create multiple courses with different subscription optionsContent dripping to release lessons gradually instead of all at onceAccess rules to protect your contentAbility to track learners’ progressAnd much more4. Install the MemberPress Plugin
First, you need to download and install the MemberPress plugin. When you purchase MemberPress, you’re able to download the software in a ZIP file to your computer.
Then, you can upload the plugin to WordPress.
For step-by-step instructions, check out our guide on how to install a WordPress plugin.
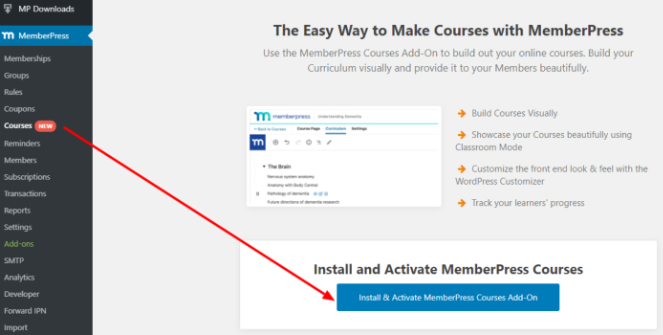
Once the plugin is installed, you’ll want to install the MemberPress Courses add-on. To do this, go to MemberPress » Courses in your WordPress dashboard and click on the Install & Activate MemberPress Courses Add-On button.
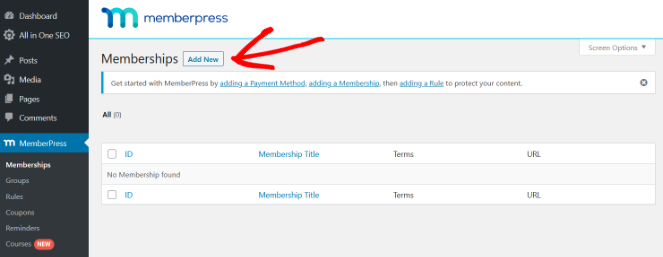
5. Create a Membership
The first step to creating an online course with MemberPress is to create a Membership. This will let you hide your eCourse from regular visitors on your site and collect payment from people that want to access it.
Go to MemberPress » Memberships in the WordPress dashboard and click the Add New button at the top of the page.
Then, you’ll see a page where you can create a new membership. You can name your membership and in the body of the membership, add text and images to advertise the key benefits of your course and sell it to the customer.
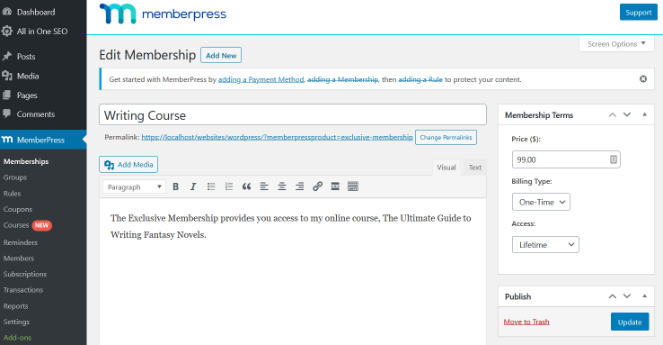
On the right side, you can also set the membership terms, including the price, billing type (recurring or one-time), and access (lifetime, expire, or fixed expire).
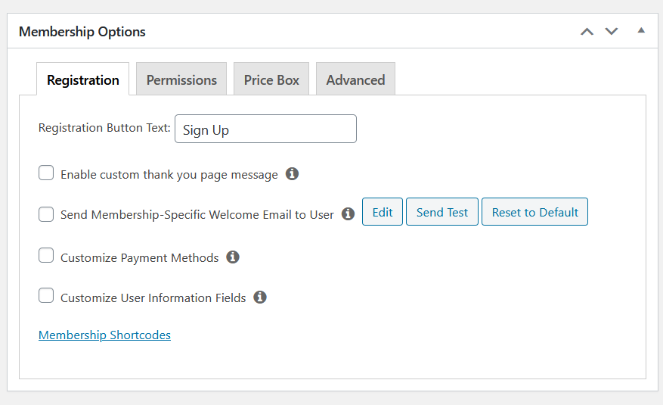
Scroll down to the Membership Options section to customize permissions and other membership options.
When you’re happy with your membership, click Publish in the top right corner.
6. Add a Payment Method
Next, you need to add a payment method if you want to make money from your course.
Go to MemberPress » Settings from the WordPress dashboard. On the Settings Page, click on the Payment tab.
To add a payment method, click on the (+) button underneath the Payment Methods section.
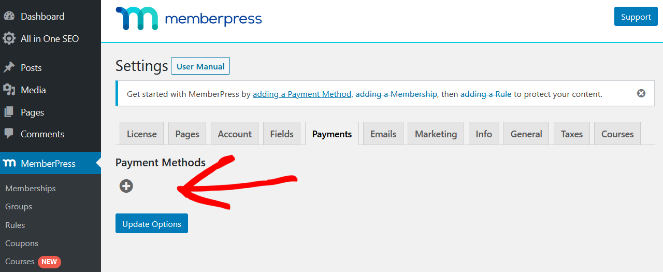
After clicking the button, a new section will appear where you can set up payments through PayPal, Stripe, and more. Select 1 or multiple payment options and provide the required credentials.
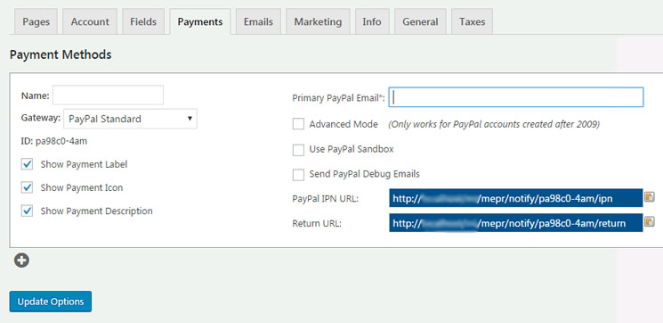
It’s best to add multiple payment methods because some users will prefer one method over the others and it can help you boost sales.
Click Update Options when finished.
Now it’s time to start developing your online course!
7. Create Your First Course
To create your first course with MemberPress, go to MemberPress » Courses from the WordPress dashboard and click on the Add New button at the top of the page.

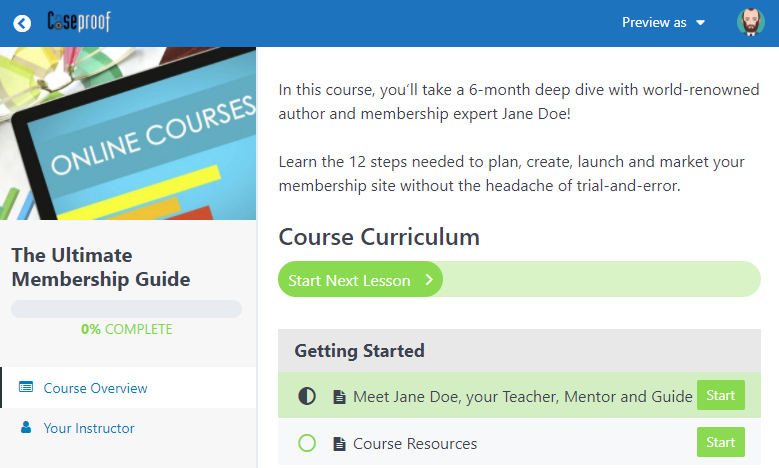
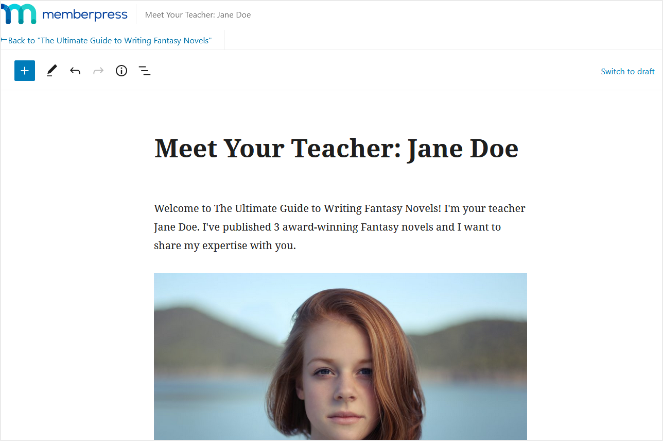
You’ll then be taken to the Course Page tab of the builder. Start by adding a catchy title for your online course in the title field provided:
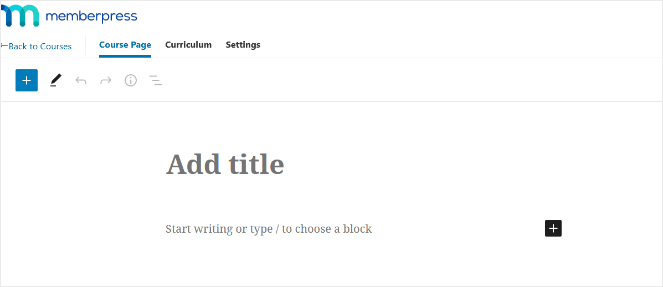
Beneath the title, you can add a description of what your course is about. This content will show up as the course overview/description on the front-end.
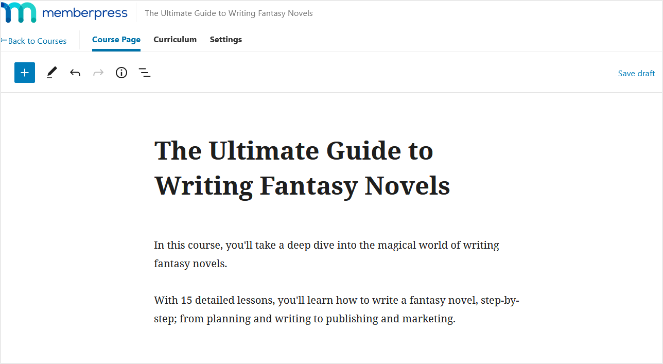
Don’t add your course content here. We’ll show you how to do that in the next section.
You’ll also want to add a featured image for your course to make it more engaging.
To add a featured image, expand the Featured Image section on the right side and click Select Image.
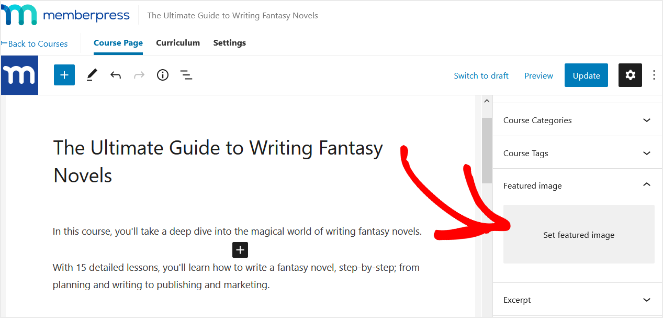
You can choose an existing image from your media library or upload a new image.
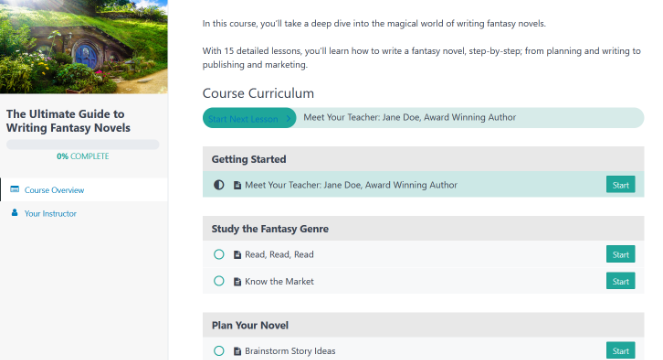
8. Add Your Course Curriculum
When you’re done adding your course title and description, click on the Curriculum tab at the top of the page to start adding your course content.
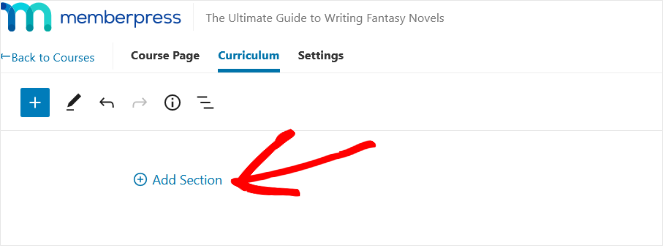
First, you need to add a section. The sections will organize your lessons into groups, so you can refer to the course outline and sections you created earlier for this step.
To add your first section, click on the Add Section button.
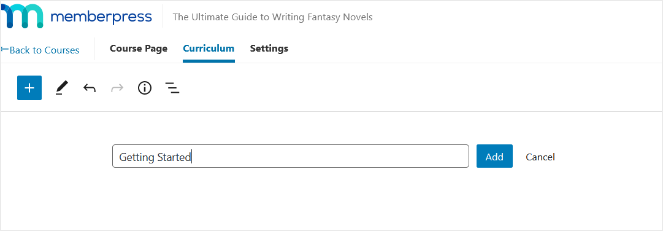
Then, pick a name for your first section and click Add.
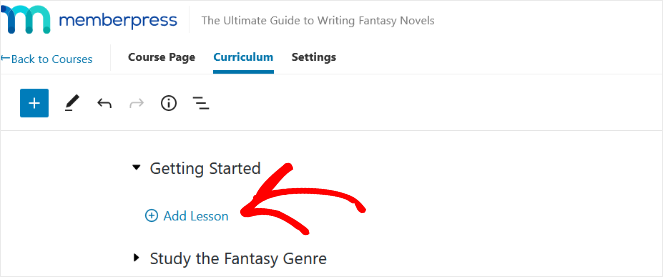
Your section will now show up on the left side of the course builder.
To add your lessons, expand each section and click on the Add Lesson button below it.
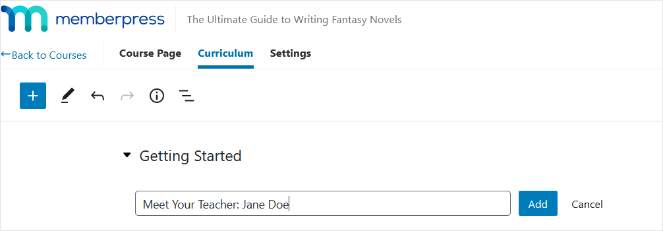
Next, choose a name for your lesson and click Add.
To add content to your lesson, click the Edit icon beside it.
Now you can add text, images, videos, and more, to your lesson just as would when writing a regular blog post in WordPress.
If you’re new to writing blog posts in WordPress, check out this guide on creating posts in WordPress and utilizing all of the features.
When you’re finished editing a lesson, you can return to your course by clicking the Back button in the top left corner.
Repeat these steps until all of your sections, lessons, and lesson content is added.
When you’re happy with your course, click Publish.
9. Configure Your Course Settings
When you’re finished adding your course curriculum, click on the Settings tab at the top of the page to configure your course settings.
The first setting is the option Include in Course Listing. Toggling this setting to On to display your courses in a nice, searchable grid on a Course Listing page on the front-end of your site.
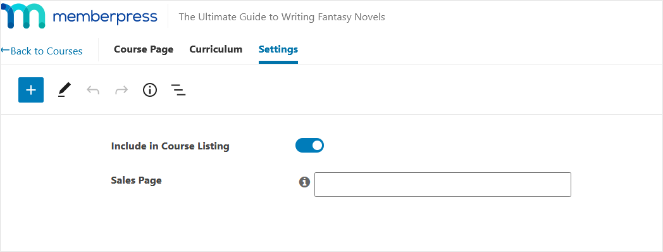
The second setting on the page is the Sales Page URL setting. In this field, you need to copy and paste the URL of the MemberPress Membership registration page that provides access to your course. You created this page earlier in step #5.
To find that URL, go to MemberPress » Memberships and copy the URL next to the Membership, like in the example below:
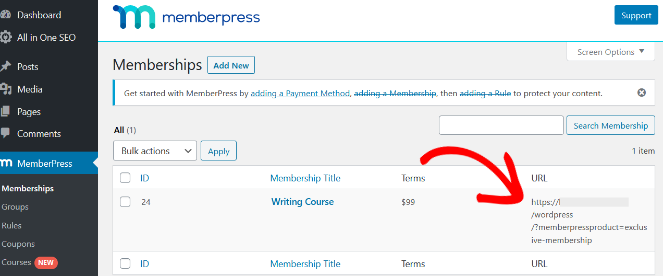
Then, paste it in the Sales Page field in the course Settings.
As we mentioned earlier, MemberPress offers a feature called Classroom Mode that will instantly give your course a professional design.
To enable Classroom Mode, go to MemberPress » Settings and click on the Courses tab. Turn Classroom Mode on by toggling the button, like in the image below:
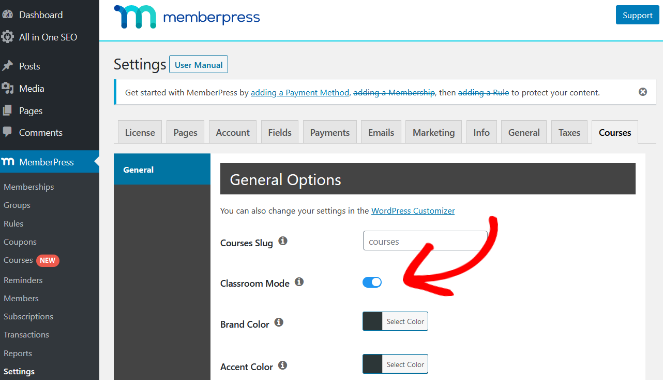
You can also choose which colors to use, add a logo, and more, to match your online course to your brand. Or, you can use the default settings.
Don’t forget to save your changes when you’re done.
10. Protect Your Course
Now you need to protect your course so that only the people that pay for it have access to it.
To do that, go to MemberPress » Rules » Add New Page and select A Single Course from the drop-down menu. Search for the course you created and select it. Lastly, choose which Membership will give users access to your course when purchased.
It will look something like this:
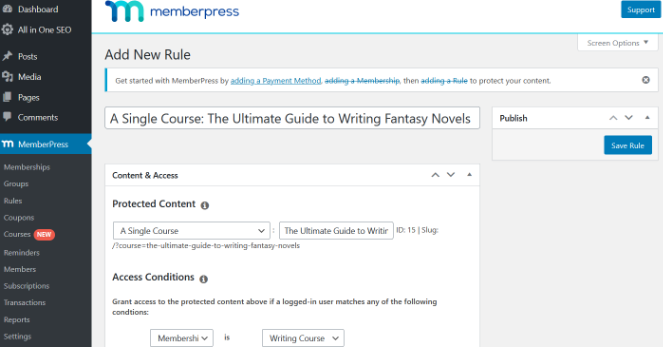
Click Save Rule.
Now only the people that have purchased a membership get access to your course.
You also have the option to protect all courses if you’ve created more than one.
11. Add Sign Up and Login Forms
To make it easy for users to sign up for your online course, you should add your membership course page to your website’s navigation menu.
To do this, go to Appearance » Menus in your WordPress dashboard. On the left side, under Custom Links, copy the URL of the membership page you created in step #5 and paste it into the URL field. Underneath, choose link text like “Courses” and click Add to Menu.
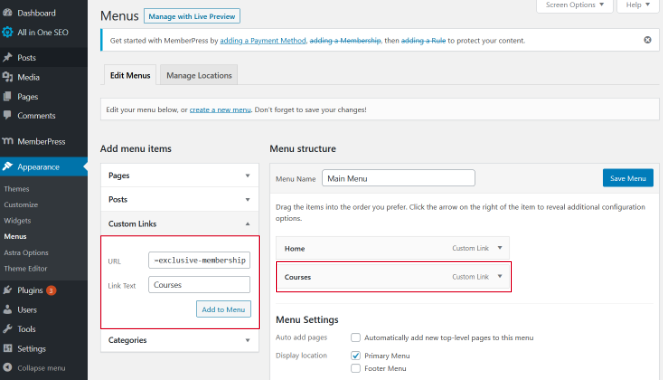
Now your course page will appear on the right underneath the Menu Structure section. You can rearrange the order of the pages in your menu by dragging and dropping them into place.
Click the Save Menu button to save the changes you made.
To add logins for existing students, go to Appearance » Widgets in your WordPress dashboard and add a MemberPress Login widget to your sidebar.
Click the Save button. Now your students have an easy way to login to your course.
If you have any other questions about using MemberPress, feel free to check out their helpful documentation.
That’s it!
You created an online course using MemberPress!
Now it’s time to encourage users to purchase it…
12. Market Your Online Course
After your online course is created, your work isn’t done. If you want a lot of people to buy your course, then you need to market it.
There are many free and affordable ways to market your online course and drive sales.
Here are a few great ideas:
Create a Coming Soon Page
Before you launch your online course, you can start building excitement for it by creating a coming soon page.
A coming soon landing page gives your website visitors a teaser about what’s to come.

Plus, you can add an email optin form to your coming soon page to generate leads and grow your email list before your course is even live.
You can easily build a coming soon page using SeedProd, the best landing page builder for WordPress.
Build an Email List
Email marketing is the most effective way to communicate with your audience; you can send your email subscribers direct messages to let them know about your online course.
Everyone uses email and the people that sign up to your email list are your biggest fans, so they’re the most likely to sign up for your online course.
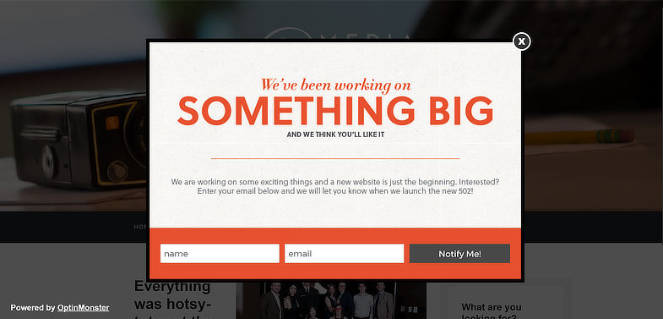
If you haven’t started an email list yet, you can use OptinMonster to quickly get subscribers. With OptinMonster, you can easily create eye-catching email popups to capture leads.
Then, you can create an email newsletter to tell your subscribers about your course and encourage them to sign up.
Promote it on Social Media
Using social media platforms like Facebook, Instagram, and Twitter is a free and easy way to get the word out about your online course.
So, start posting about your course on social media early on to build interest with your followers.
But, don’t post only about your course. Consistently share a variety of content on social media that’s valuable to your followers. That way, they’ll get used to coming to your page for useful content. Then, when you promote your course to them, they’ll already have trust that what you’re offering is valuable.
An added benefit of posting on social media is that your followers can like, comment, and share your posts, which will help widen your reach and introduce your course to other people.
That’s a wrap!
Now you know how to create an online course with WordPress and you have a new revenue stream for your blog!
If you enjoyed this post, check out our guide on smart ways to make money online.
And don’t forget to sign up to our email newsletter so you can get useful content like this sent right to your inbox!
By: AllisonTitle: How to Create an Online Course with WordPress (And Make Money)
Sourced From: Original Article Location: www.blogtyrant.com/how-to-create-online-course-with-wordpress/
Published Date: date2021 01 08